
Created : 19 April 2021
Last Modified : 21 Feb 2024
***********************************************************************************
Contents:
A. SUMMARY
B. FILE STRUCTURE
C. INSTALLATION INSTRUCTION
D. HOW IT WORKS
E. CONFIGURATION SETTINGS
F. DATABASE TABLES MODIFIED
G. LANGUAGE SETTINGS CHANGED
H. CHANGE LOGS
I. TROUBLESHOOTING
J. FAQ
K. COPYRIGHT NOTICE
L. TERMS AND CONDITIONS
***********************************************************************************
A. SUMMARY
==========
This interface is for use with Stripe Checkout Hosted payment gateway.
Features:
Both normal checkout and one-page checkout method are supported by this module.
To use this module, you must register an account first with Stripe.
You can register at https://dashboard.stripe.com/register
IMPORTANT NOTE:
It is strongly recommended to have SSL certificate installed on shopping cart site for security and PCI compliance.
If you do not have any SSL Certificate in your current site, you can purchase SSL from us at:
https://www.vpcart.com/virtprog/instantssl1yr.htm
***********************************************************************************
B. FILE STRUCTURE
===================
Files included in the zip are:
- $READ_ME_FIRST_stripehosted900.HTML
- stripehosted_execute.asp
- stripehosted_process.asp
- stripehostedcallback.asp
- stripehostedcancel.asp
- stripehostedconfig.asp
- stripehostedgateway.asp
- stripehostedresult.asp
- plugins/stripehosted/client.js
- admin/shopa_stripehosted_config.asp
-
admin/stripehosted_getrefundamt.asp
-
admin/stripehosted_refundvoid.asp
-
admin/stripehosted_setup.asp
-
admin/stripehosted_setup_config.asp
-
admin/stripehosted_setup_process.asp
- admin/stripehosted_subs.asp
- admin/stripehostedconfig.asp
- admin/help/shoph_stripehosted.asp
- admin/js/stripehosted/stripehosted.css
- admin/js/stripehosted/stripehosted.js
- admin/js/stripehosted/striperefund.js
- admin/images/stripehosted/*
-
admin/sqlscripts/stripehosted/*
***********************************************************************************
C. INSTALLATION INSTRUCTION
============================
1. Upload the below files and folder to your VPCart 9.00 root folder.
- stripehosted_execute.asp
- stripehosted_process.asp
- stripehostedcallback.asp
- stripehostedcancel.asp
- stripehostedconfig.asp
- stripehostedgateway.asp
- stripehostedresult.asp
- plugins/stripehosted/client.js
2.
Upload the below files to your ADMIN folder. If you have renamed your ADMIN folder, then this must be placed in the renamed folder.
- admin/shopa_stripehosted_config.asp
-
admin/stripehosted_getrefundamt.asp
-
admin/stripehosted_refundvoid.asp
-
admin/stripehosted_setup.asp
-
admin/stripehosted_setup_config.asp
-
admin/stripehosted_setup_process.asp
- admin/stripehosted_subs.asp
- admin/stripehostedconfig.asp
- admin/help/shoph_stripehosted.asp
- admin/js/stripehosted/stripehosted.css
- admin/js/stripehosted/stripehosted.js
- admin/js/stripehosted/striperefund.js
- admin/images/stripehosted/*
-
admin/sqlscripts/stripehosted/*
3. Log into super admin and execute page below:
http://www.yourdomain.com/<your admin folder>/stripehosted_setup.asp
Note: Replace the below with your VPCart site
{ www.yourdomain.com } : your site domain
{ your admin folder } : your admin folder
Click Install Now button.
4. After installation completed, click Next button:
5. You will be redirected to Stripe configuration page.
- Do you want to enable Stripe Hosted module?
Set to Yes to enable Stripe Checkout Hosted Payment gateway.
You are required to get Publishable key, Secret key and setup Business account before "Enable" the module.
Please follow below guide to setup Business account:
1. Log in to Stripe with your email address and password.
2. After loggen into the account, click on Settings on the left side.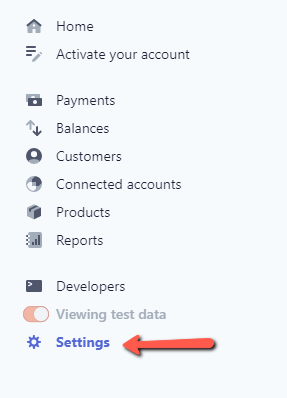
3. At center panel, click "Account details" under "Business settings".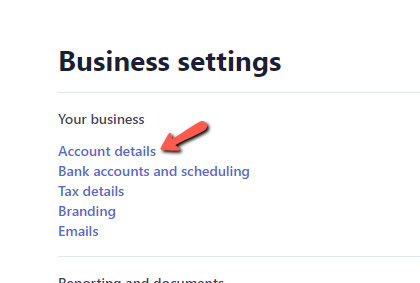
4. Fill in the information under "Account settings" section, then click "Save" button.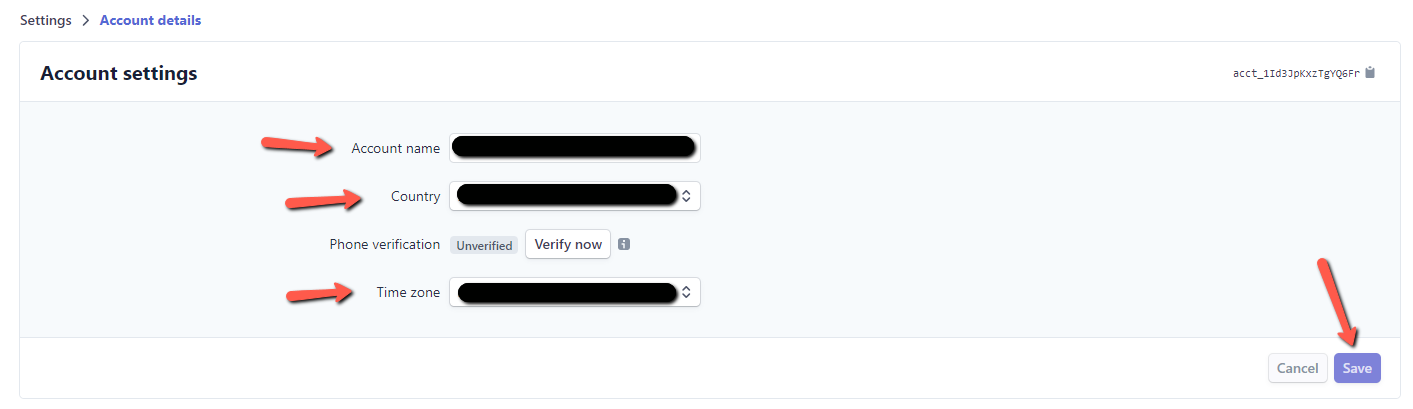
It is important and you are REQUIRED to setup on your Stripe panel.
What is Webhooks URL:
We set Webhooks URL on Stripe which the orders payment transaction detail would be returned silently via this URL.
After VPCart receive the notification, VPCart would update these payment information to the specify order.
Please follow below guide to setup Webhooks URL:
1. Log in to Stripe with your email address and password.
2. After loggen into the account, click on Developers, then Webhooks on the left side.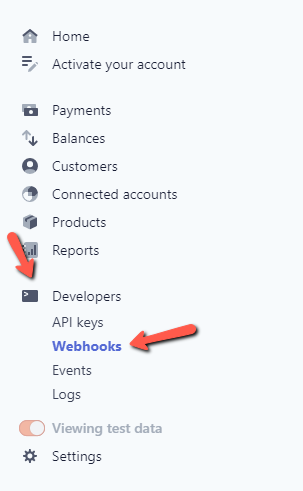
3. Click on button "Add endpoint" on the Endpoints section.
4. Pleae fill in the information for the following fields:
Endpoint URL: The Webhook URL setup on your site. Eg: https://v9deluxesql.cartmonkey.com/stripehostedcallback.asp
where v9deluxesql.cartmonkey.com is your domain and the store folder.
stripehostedcallback.asp is the page URL you must include.
Events to send: You must select "checkout.session.completed" from the Select events dropdown field.
5. Click "Add endpoint" button after all information filled.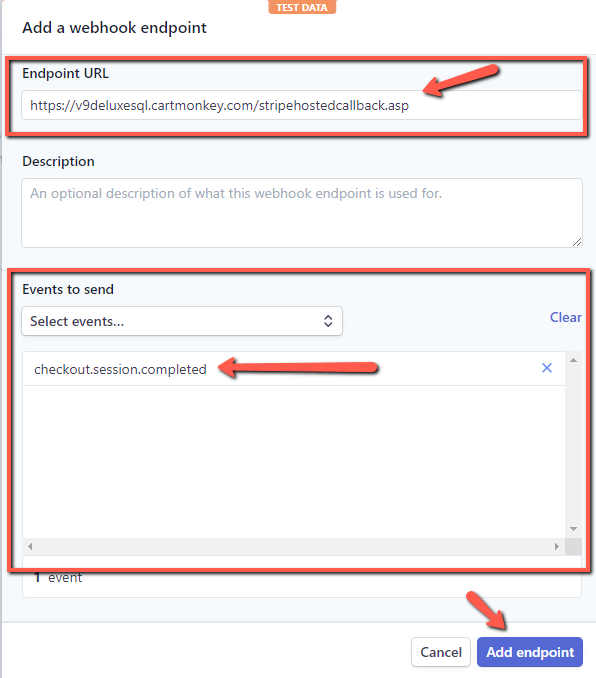
6. After Webhook URL created, please click "Click to reveal" button on "Signing secret" section
6. Copy the signing string, and paste to "Webhooks event key" field.
Notes: You are required to going thru the "Activate your account" process before accepting payments with Stripe.
Please follow below guide to Activate your account:
8a. Log in to Stripe with your email address and password.
8b. After loggen into the account, click on "Activate your account" on the left side.
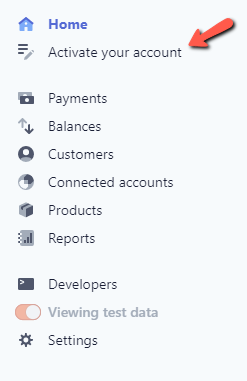
8c. Going thru the steps provided by Stripe and finally your account will be get activated.
***********************************************************************************
***********************************************************************************
E. CONFIGURATION SETTINGS
=================
Refer to Stripe Hosted configuraiton page
F. DATABASE TABLES MODIFIED
===========================
Orders table, new fields:
- otransid text 50
- occlastdigits text 50
- oauthcode text 50
- orefundtype text 1
- oaddonmodulename text 100
- ostripesessionid text 200
- ostriperefundid text 100
- ostriperefunddatetime text 50
Orders table, existing field size changed:
-
oauthorization field size increased to text 4000
G. LANGUAGE SETTINGS CHANGED
============================
New languages for Stripe Hosted
H. CHANGE LOGS
============================
2022.05.23 - stripehosted: Bug fix: Possible no return json response from endpoint
2023.02.03 - stripehosted: Added version and line-items fix
2024.02.21 - oemail empty value fix
***********************************************************************************
I. TROUBLESHOOTING
============================
Please submit a ticket to our helpdesk at https://helpdesk.vpcart.com and our support team will assist you.
***********************************************************************************
J. FAQ
============================
NONE
***********************************************************************************
K. COPYRIGHT NOTICE
============================
Copyright (c) 1999-2024 Rocksalt International Pty. Ltd.
All rights reserved.
This software and documentation constitute a published work and
contains valuable trade secrets and proprietary information
belonging to Rocksalt International Pty. Ltd. .
None of the foregoing material may be copied,
duplicated or disclosed without the express written permission
of Rocksalt International Pty. Ltd. .
LICENSEE ACCEPTS VP-ASP Shopping Cart "AS IS" "WITH ALL FAULTS",
Rocksalt International Pty. Ltd. accepts no responsibility for the
operation or performance of the VP-ASP Shopping Cart.
The entire risk of use and consequences of use of the
VP-ASP Shopping Cart falls completely on the Licensee
and Rocksalt International Pty. Ltd. shall not be liable in any respect
for any claims, loss or injury alleged to have resulted
from use of or in reliance on VP-ASP Shopping Cart.
Licensee acknowledges that it has read the foregoing
disclaimers of warranty and limitation of liability
and understands that Licensee assumes
the entire risk of using VP-ASP Shopping Cart.
***********************************************************************************
L. TERMS AND CONDITIONS
============================
ROCKSALT INTERNATIONAL GRANTS TO THE LICENSEE A NON-EXCLUSIVE,
NON-SUB LICENSABLE, NONTRANSFERABLE LICENSE
TO INSTALL AND USE THIS APPLICATION ON A SINGLE DOMAIN FOR
A SINGLE SHOP.
THE CODE IN THE APPLICATION MAY BE MODIFIED FOR USE IN
SETTING UP A SINGLE SHOPPING SITE ON THE WORLD WIDE WEB.
LICENSEE MAY MAKE A COPY OF THE APPLICATION FOR
BACK-UP AND ARCHIVAL PURPOSES, PROVIDED THAT ANY COPY
MUST CONTAIN ALL PROPRIETARY NOTICES INCLUDED
WITH THE APPLICATION.
LICENSEE IS PROHIBITED FROM SELLING OR DISTRIBUTING
THE APPLICATION IN ANY MANNER.
LIMITATION OF LIABILITY.
ROCKSALT INTERNATIONAL AND ITS LICENSORS SHALL
NOT BE LIABLE FOR ANY DAMAGES SUFFERED BY LICENSEE OR ANY
THIRD PARTY AS A RESULT OF USING OR DISTRIBUTING THIS
APPLICATION.
IN NO EVENT WILL ROCKSALT INTERNATIONAL OR ITS LICENSORS
BE LIABLE FOR ANY LOST REVENUE, PROFIT OR DATA,
OR FOR DIRECT, INDIRECT, SPECIAL,
CONSEQUENTIAL, INCIDENTAL OR PUNITIVE DAMAGES,
HOWEVER CAUSED AND REGARDLESS OF THE THEORY OF LI
ARISING OUT OF THE USE OF OR INABILITY TO USE THE SOFTWARE,
EVEN IF ROCKSALT INTERNATIONAL HAS BEEN ADVISED OF THE
POSSIBILITY OF SUCH DAMAGES.